Overview
Baerveldt plate erosion revision surgery involves removal of a migrated implant and replacement with a posteriorly positioned Paul Glaucoma Implant. Aqueous shunts or glaucoma drainage devices are widely used in glaucoma practice for patients with more recalcitrant glaucomas because of their broad effectiveness in reducing intraocular pressure. Plate exposure is a relatively rare but challenging complication associated with anterior migration of the implant. This case demonstrates surgical revision with implant removal, posterior dissection, and replacement using a Paul Glaucoma Implant.
Video On YouTube
This video demonstrates revision surgery for Baerveldt plate erosion with implant replacement using a Paul Glaucoma Implant.

If age-restricted, please watch this video directly on YouTube.
Case Context
- Prior surgery: Baerveldt 350 glaucoma drainage device implantation
- Scenario: Early postoperative anterior migration with plate exposure and tube proximity to cornea
- Focus of video: Removal of existing implant and replacement with posteriorly positioned Paul Glaucoma Implant
Key Observations
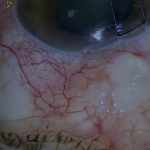
- Plate exposure associated with anterior migration of Baerveldt implant [00:00]
- Conjunctiva and Tenon’s are tightly adherent requiring extensive mobilisation [00:48]
- Tube is ligated and secured to prevent decompression during plate removal
- Posterior capsule dissection is required to allow repositioning of new plate
- Fibrin glue and nylon sutures used for conjunctival closure after revision
Transcript
[00:00] Aqueous shunts or glaucoma drainage devices are widely used in glaucoma practice for patients with more recalcitrant glaucomas because of their broad effectiveness in reducing the intraocular pressure in many different and difficult situations.
However, one challenging complication that is fortunately relatively rare is exposure of the implant plate. In this video, I’m going to show how I managed one such case where a Baerveldt implant had migrated forward in the first few weeks after surgery, exposing the edge of the implant plate and resulting in the tube being too close to the cornea, which was also oedematous.
Read Full Transcript
Initial Exposure And Conjunctival Dissection
[00:48] In this video, I’m going to show how I repaired an exposed Baerveldt plate that had migrated anteriorly during the first few weeks after implantation. This Baerveldt 350 has migrated forward, exposing the edge of the plate.
This has resulted in the tube moving too close to the cornea, which is also failing. Exposed tubes are always surrounded by an area of tight conjunctiva. In this case, it is extremely tight. I usually open the conjunctiva at the limbus and mobilise both conjunctiva and Tenon’s extensively via a wide peritomy.
Not unexpectedly, there are some dense adhesions around the anterior edge of the Baerveldt plate. Extensive conjunctival mobilisation will be required for closure, and it’s best to start at the beginning of the procedure. The adherent conjunctiva and Tenon’s are slowly dissected back to the plate. Both are dissected off sclera together until the plate is reached.
In this situation, I would normally separate conjunctiva from the capsule over the plate. In this patient, despite the dense adhesions, the capsule is not developed yet as the original implantation was recent. Posterior dissection is performed with the scissors close to the conjunctival undersurface, with the tips visible where possible. Again, it is impossible to overemphasise the importance of maximising conjunctival and Tenon’s mobilisation.
Tube Management And Implant Removal
[02:44] The thin fibrous capsule around the tube is incised. In this case, the tube wall has been perforated inadvertently by the blade, but this is not important as the tube is about to be removed.
In the situation where a tube has migrated anteriorly, the plate in general needs to be relocated more posteriorly. This requires such extensive dissection that it actually makes more sense simply to replace the entire implant. To reduce encapsulation after this second procedure in a short time, mitomycin C is applied over the existing plate to the undersurface of Tenon’s, using two sponges soaked in 0.5 mg per ml for five minutes.
The Paul Glaucoma Implant tube is flushed in this case from both ends with BSS via a 21-gauge cannula to ensure patency and eliminate static. A 6-0 Prolene suture on a quarter-circle needle is threaded from the plate into the tube, with the needle still attached.
The challenge will be to replace the existing implant plate without decompressing the eye during removal. To achieve this, the existing tube must be secured and ligated to prevent movement or drainage when the plate is removed. First, the tube is ligated with 9-0 nylon around the pre-existing ripcord suture to ensure that it will not drain.
Next, the same 9-0 nylon is secured to sclera to prevent movement once the tube is amputated from the plate. Once the tube has been ligated and secured tightly to sclera, it is then cut so the plate can be removed.
Before removing the plate, the fibrous pegs that have formed through the perforating holes must be cut. In this case, the pegs have already been cut during the initial extensive dissection. The plate can then be removed easily.
Posterior Dissection And New Plate Positioning
[05:09] In order to place the new plate far enough back, any adhesions or remaining capsule from the previous plate must be incised. This often requires blind dissection through the wall of the posterior fibrous capsule left behind by the previous plate.
The capsule must be incised completely and all adhesions broken, which does require some persistence. If the posterior wall of capsule is not incised completely, the new plate will not sit further back than the previous one.
It is interesting that the posterior capsule wall is much more dense than the almost non-existent anterior capsule. This asymmetrical scarring appears to be a common feature of implant plates that have moved forward and exposed. Often, it is the posterior scarring that forces the plate forward, resulting in the exposure.
The Paul Glaucoma Implant plate can now be manoeuvred into place. In this case, the front edge has slipped back 14 mm from the limbus quite easily.
7-0 silk Tenon’s traction sutures keep the Tenon’s from entangling the plate sutures while the plate is secured. It is essential to secure the plate tightly to sclera. I use 9-0 polypropylene sutures placed diametrically opposed. Loose plate sutures are associated with greater micro-movement of the plate, which stimulates encapsulation. Ideally, the plate should be tightly adherent to sclera.
The second suture pulls the plate against the first, splinting the plate in two dimensions, side to side and front to back.
Tube Insertion And Graft Coverage
[07:20] The new tube entry site is made adjacent and slightly posterior to the original. This needle stab has caught iris root, so multiple needle passes are made to ensure a clean, resistance-free path for the tube, taking care not to widen the entry site in the process.
The tube is trimmed with as long a bevel as possible and inserted bevel-up. It is important to be able to visualise the tube tip in the anterior chamber, which can be tricky if the cornea is oedematous.
After the new tube is in position, the amputated portion of the old tube can be replaced with a donor scleral plug. The plug is easily secured with fibrin tissue glue. The new tube is then secured with 9-0 nylon mattress sutures, which have a lower propensity to erode than polypropylene.
I position the knots well away from the tube and bury them where possible. Knots overlying tubes are a cause of erosion. Before closing, it is important to check that the tube is draining aqueous and that it is not draining excessively.
A corneal groove is then fashioned in which to bury the 6-0 polypropylene ripcord. The polypropylene ripcord is now buried in a peripheral corneal loop to facilitate later removal. As the straight needle is quite large, this is easier to achieve if the ripcord is attached to a quarter rather than a half-circle needle.
Fibrin glue is then applied to bare scleral surface. A donor scleral patch graft is applied covering both the tube and the cut end of the polypropylene ripcord.
Conjunctival Closure And Revision Considerations
[09:22] At the end of revision cases, it can be difficult to re-oppose Tenon’s and conjunctiva even after extensive mobilisation. One way to bring Tenon’s forward is to depress the Paul Glaucoma Implant plate with forceps and lift any Tenon’s bunched up behind it.
This often reveals that there is more conjunctiva and Tenon’s available for closure than it may seem initially. In this case, to mobilise sufficient tissue, some extra dissection is required in one area.
The conjunctiva and Tenon’s are re-opposed with fibrin glue. The conjunctiva is finally secured with a number of 10-0 nylon sutures that reduce tension on the glue. Few sutures are required when fibrin glue is used with a primary shunt implantation. However, with an extensive revision, much more secure suturing is required.
I prefer nylon to absorbable sutures. I find that Vicryl creates too much conjunctival inflammation and absorbs too slowly. I will typically remove nylon after three weeks at the slit lamp, whereas Vicryl requires five to six weeks to absorb.
For outcome benchmarking, see the International Glaucoma Surgery Registry.