Overview
The Paul Glaucoma Implant technique shown here focuses on secure plate placement, accurate tube alignment and controlled early flow using a 6-0 polypropylene ripcord. The approach aims to achieve physiological intraocular pressure in the immediate post-operative period while reducing the risks of hypotony and conjunctival erosion. Keith Barton highlights practical decisions at each step that support predictable flow control and stable long-term positioning, offering a clear and reproducible method for surgeons and trainees.
Video on YouTube
This video demonstrates the Paul Glaucoma Implant technique with controlled flow using a 6-0 polypropylene ripcord.
🔞 This video is age-restricted. Please watch it on YouTube.
Key points
- Use a 6-0 polypropylene ripcord to stent the 127 µm lumen and titrate early flow to physiological IOP.
- Secure the plate at least 10 mm posterior to the limbus in the superotemporal quadrant with two tight, diagonally opposed 9-0 polypropylene sutures.
- Create a 25-gauge entry just over 1 mm posterior to the limbus; align the tube parallel and just anterior to the iris plane.
- Minimise erosion risk with firm tube fixation using 9-0 nylon mattress sutures, careful knot placement, and appropriate patch graft selection.
- Bury the ripcord in a corneal loop for slit-lamp access; consider ripcord removal if IOP later elevates, typically after three months when using mitomycin-C.
Transcript
Initial Experience and Evolution of the Paul Glaucoma Implant Technique
When I first started implanting the Paul Glaucoma Implant in December 2017, I followed essentially the same implantation technique that I had used for many years with the Baerveldt implant. The one exception was that I used a 6-0 polypropylene ripcord rather than the 3-0 nylon that had been traditional with a Baerveldt. This technique served me well, and I soon found that I was ligating the Paul Glaucoma Implant much less frequently than I was with the Baerveldt. However, there have been other minor changes and refinements to the technique over the intervening years. In this video, I show my updated Paul Glaucoma Implant technique.
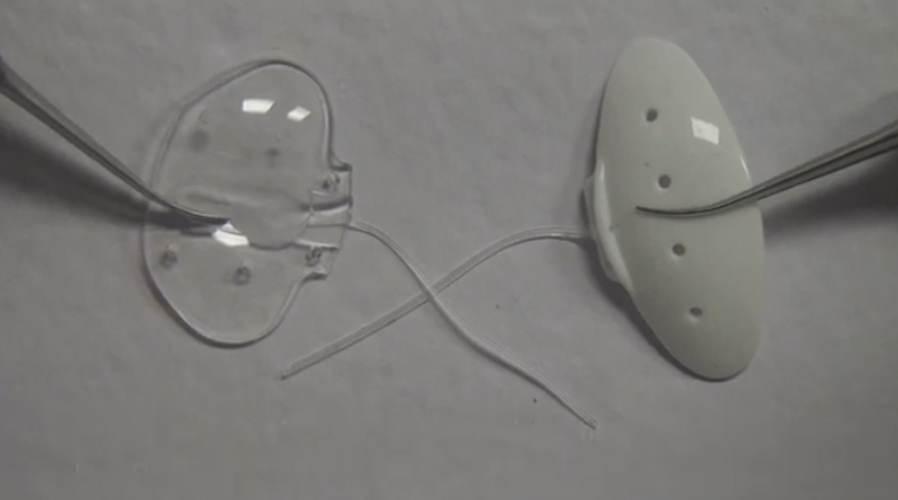
Device Dimensions and Rationale
At 342 mm², the Paul Glaucoma Implant has a large surface area comparable to the Baerveldt 101-350. Its breadth is less, but its depth is approximately 1 mm greater, increasing the usable plate surface not obscured by rectus muscles. The tube lumen, at 127 micrometres, is smaller than that of an Ahmed valve or Baerveldt and only slightly larger than a Preserflo MicroShunt. Until recently, commercially available tubes were much larger than required, at around 640 microns, occupying the drainage angle and needing to rest on the iris to avoid corneal endothelial touch. A smaller tube may reduce endothelial cell loss and reduce the risk of conjunctival erosion. The smaller lumen can be stented with 6-0 polypropylene rather than 3-0 nylon, enhancing predictability.
Read more
This technique emphasises controlled early flow to maintain physiological IOP and reduce the risk of hypotony. The smaller lumen and use of a 6-0 polypropylene ripcord allow gradual, titratable aqueous flow. Secure plate fixation, careful tube positioning, and choice of patch material are important to minimise long-term erosion risk.
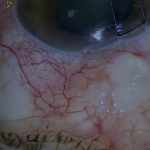
Conjunctival Peritomy and Ripcord Placement
After placing a 7-0 silk traction suture, a 2–3 clock-hour limbal peritomy is made. After flushing the tube with BSS and irrigating the plate, the 6-0 polypropylene is fed into the lumen. The tube is typically stented all the way into the anterior chamber, usually providing sufficient resistance to prevent early hypotony. The ripcord can be seen on gonioscopy.
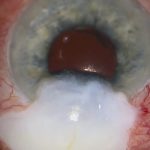
Plate Placement and Suturing
After clearing any Tenon’s attachments with blunt dissection, the implant is placed under adjacent recti. I prefer the superotemporal quadrant. The plate should be positioned at least 10 mm posterior to the limbus. I retract Tenon’s with three 7-0 silk traction sutures to improve access and prevent sutures tangling in tissue. The plate is secured to sclera with two 9-0 polypropylene sutures, diagonally opposed and tightened to prevent micro-movement.
Anterior Chamber Entry and Tube Insertion
The tube is trimmed slightly longer than required initially. The anterior chamber entry is made with a single 25-gauge needle, just over 1 mm behind the limbus. The tube should lie just anterior to the iris and parallel to the iris plane. The Paul Glaucoma Implant tube fits snugly through a clean 25-gauge track. If more length is needed, the tube can be redirected more radially. The tube is secured to sclera with 9-0 nylon mattress sutures. Risk factors for erosion include tube movement, bends, prominent knots, and eyelid margin rubbing. Nylon is used as knots are less prone to erode through conjunctiva than polypropylene.
Flow Regulation Using the Ripcord
I visualise the rate of aqueous drainage from the back of the plate. The goal is physiological IOP levels immediately and throughout the early postoperative period. The 6-0 polypropylene ripcord initially stents the entire tube and can then be withdrawn gradually according to drainage rate. If outflow is brisk, the ripcord may be advanced further; pulling is often easier than pushing. If full-length stenting gives insufficient resistance, the tube is ligated with 10-0 nylon, later releasable by laser. If flow is absent, ensure adequate IOP (e.g., by BSS injection) and withdraw the ripcord incrementally. If the 6-0 is too tight and permits no flow, it is replaced with 7-0.
Patch Grafting and Conjunctival Closure
I currently bury the ripcord in a corneal loop to allow slit-lamp access. This requires insertion with the needle still attached. A partial-thickness corneal groove accommodates the loop. Tubes must be patched to prevent erosion. I use human fascia lata for superior tubes and cornea for inferior tubes; donor sclera remains the most durable for high-risk cases. I no longer use human pericardium because of its propensity to thin over time. Both patch and conjunctiva are secured using fibrin glue to minimise suturing. Nylon is preferred for conjunctival closure; Vicryl causes more inflammation and absorbs slowly. Nylon is usually removed at around three weeks.
Postoperative Course and Ripcord Removal
The postoperative course is generally more predictable than with earlier implants. If IOP later elevates, the polypropylene ripcord can be removed at the slit lamp when placed in a corneal loop, or by opening conjunctiva. As I routinely use mitomycin-C over the plate, I typically wait at least three months before ripcord removal.
For outcome benchmarking, see the International Glaucoma Surgery Registry.